In the "Family Tree Maker - Mac Version" Facebook group, there was a conversation recently about Family Tree Maker's DNA Markers fact. Several people didn't realize that the fact was available, and others pointed out that it was of marginal use because of its format (I agree with this assessment). I like to add custom facts to Family Tree Maker to suit my personal research workflow, and I had done this with DNA information.
Although I am not using the DNA Markers fact (I find DNA markers are too complex to be handled effectively inside of FTM so I use Genome Mate Pro—which is not for the faint of heart—for that), I had added a GEDmatch Kit # fact to keep up with the kit numbers for my confirmed matches. One thing I realized from the conversation is that not everyone knows how to add custom facts to Family Tree Maker. There is a long list of facts available in the Fact Manager. You are probably familiar with the default facts like Name, Birth, Death, Marriage, and maybe even with less commonly used facts such as Elected or Origin. What you may not realize is that you can add custom facts useful to you, such as Facebook Profile, DNA Kit #, Cell Phone #, and more.
We will walk through the process of adding a fact to Family Tree Maker, but I recommend backing up your data file before making any changes. Also, keep in mind that changes you make to the list of facts will be per database, so if you have multiple databases the changes will have to be made to each one. My version is the Mac version, but MacKiev has streamlined the Windows and Mac versions to the point that instructions for one version should work for both.
To find the list of default facts and manage them, open Family Tree Maker and the database file you want to work on. If you do not feel confident about making changes, try creating a new database file for testing purposes as I have done (File > New). You can enter a couple of names and work with it first so you can see the effects of your changes before trying to apply changes to your main database.
Now that you have backed up your database or created a new one for testing, let's get started...
Choose Edit > Manage Facts... from the menu.
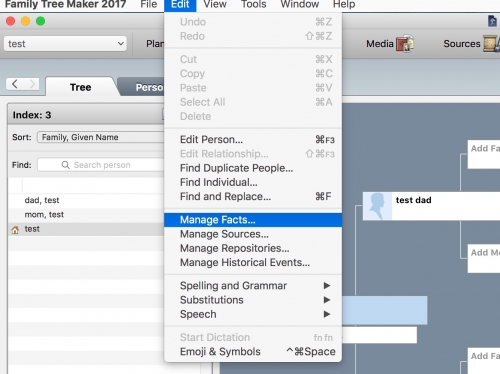
You will see the list of default facts available as pictured below. We are going to add a fact called GEDmatch Kit #. To add a fact, click the + button below the list of facts:
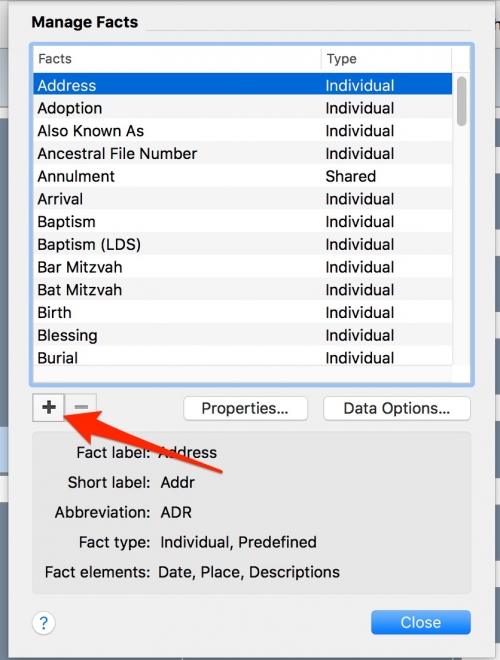
The window we are presented with (see below) asks for 3 names for the fact: Fact Label (the long name), Short Label (the short name, limited to 6 characters), and Abbreviation (limited to 3 characters). This is an individual fact (meaning it is not shared between two individuals like a marriage would be). The Fact Element choices are Date/Place, Date/Place/Description, or Description only. I chose Description only but you may prefer to know when the test was taken or uploaded to GEDmatch.com - if so, choose Date/Place/Description. Unfortunately, there is no option for just Date/Description.
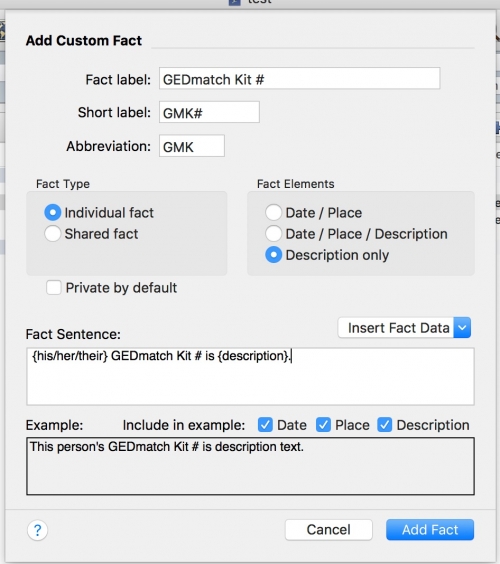 You will notice the field for Fact Sentence. Fact Sentences are only used in Ahnentafel reports, descendant reports, or Smart Stories; in all other places the fact will be presented in data format. You can set up the Fact Sentence however you want it to read. In this case, I only am using description so I deleted everything and wrote (items in italics are fields inserted from the dropdown menu) "{his/her/their} GEDmatch Kit # is {description}." Additionally, since I wanted my example sentence to use the elements that I am including, I checked the Description option before verifying that the example sentence reads how I want it to read. Click the Add Fact button, and you have added a fact.
This new fact will appear everywhere your list of facts is available. Facts that are commonly used can be added to the fact panel on the right of the Family Tree Maker window for easy access by clicking the Customize View button at the bottom of the panel. Once you add facts through the Manage Facts interface, those new facts will be available from within the Customize View options window.
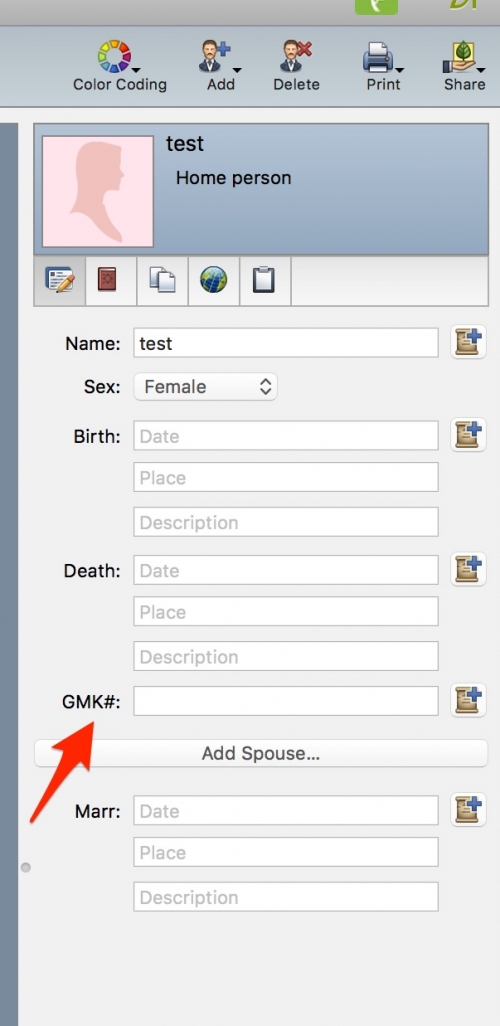
You can see where I have customized the fact panel in this test database in the screenshot below. The Short Label will always be the one displayed in the fact panel, while the Long Label will be displayed in reports.
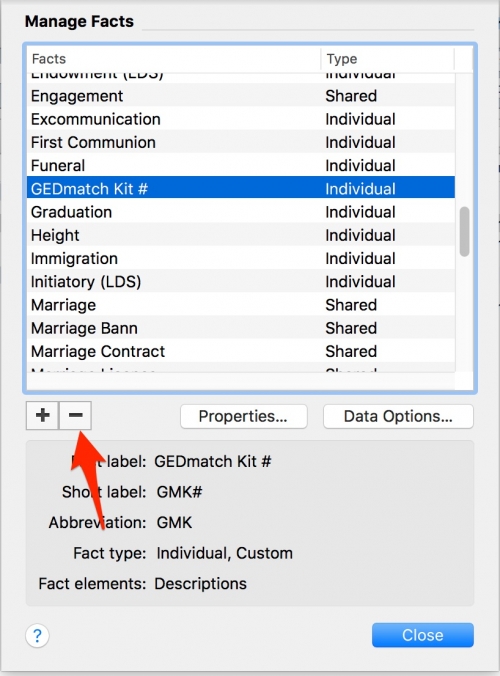
If you change your mind about a custom fact that you have added, you can remove it by clicking the minus sign in the Manage Facts panel (you will have the option to delete the associated data or move it to another fact):
Have you added custom facts to your database? Which ones have you found the most useful for quick reference? If you are ready to learn more, my next post covers customizing facts in Family Tree Maker.


Veronica
I have been using custom facts for some time and wish this post was there then! I too am using them for DNA associated conclusions. I am currently revising my DNA facts and was wanting to produce a list of everyone who has the lets say 'DNA" fact - and to be able to see what has been entered against that. The only way I can see to generate the information is through filters and I don't seem to be able to export a list but rather need to screenshot images of the names to go back to them one on one. Any help appreciated!
Mary Ann
Hi Veronica - Sorry for the delay in answering your question. The best way to do this is with the Custom Report under Person Reports. After you click Create Report, choose Selected Individuals. In the pop-up box, choose Filter In and it will allow you to select a fact and the value you want to include. The default screen is Vital Facts, so you will need to click on All Facts to include your custom facts in the filter. In this case, select Any Data for the DNA fact and the filter would include all individuals for whom you have entered a value for "DNA." Click OK, then Apply. At that point you can print or save a PDF of the report. You can also use the Share button to export the information in the report in a variety of formats, including CSV.