In my last post, I showed you how to add facts in Family Tree Maker. In this post, I'm going to show you how to customize facts in Family Tree Maker by changing some of the options in the default facts. This can be helpful if you don't like the wording in your reports, or if you want to add or remove information from the sentences generated. As I mentioned in my previous post, Fact Sentences are only used in Ahnentafel reports, descendant reports, or Smart Stories; in all other places the fact will be presented in data format.
As always, backup your data before making changes. To find the list of default facts and manage them, open Family Tree Maker and the database file you want to work on. If you do not feel confident about making changes, try creating a new database file for testing purposes as I have done. You can work with it first so you can see the effects of your changes before trying to apply changes to your main database.
Let's get started...
Choose Edit > Manage Facts... from the menu. You will see a window similar to the one below.
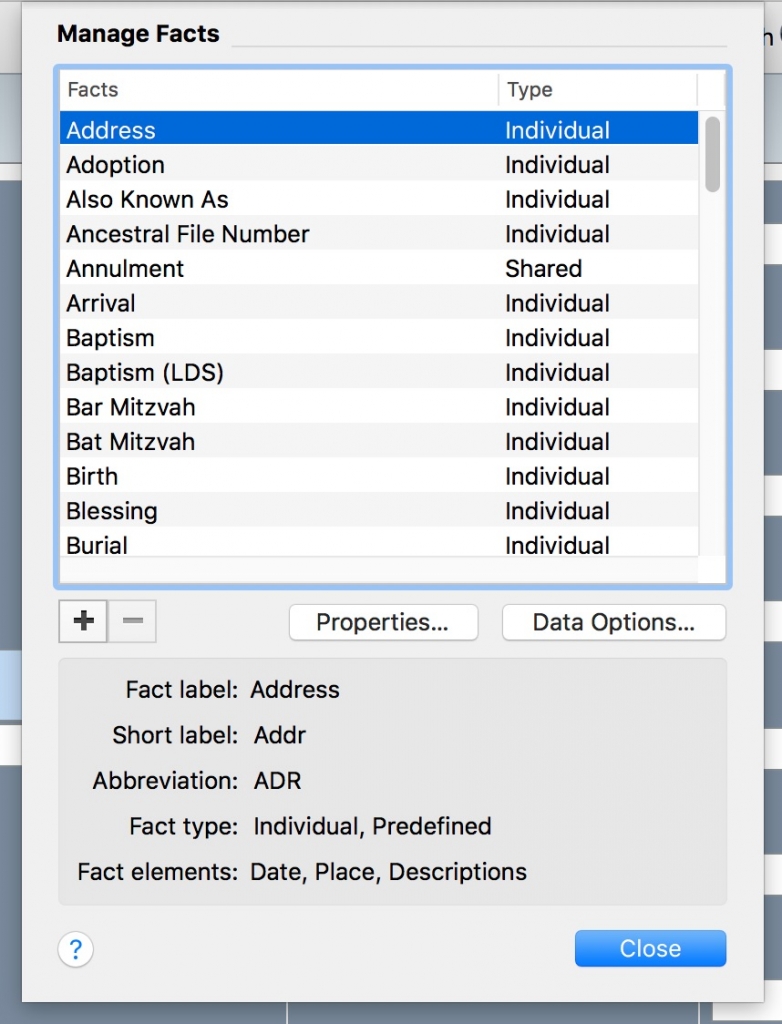
We are going to use the Address fact to examine the properties. Click on Address, then click the Properties button. Note that the fact labels and abbreviation are grayed out because those cannot be changed for default facts.
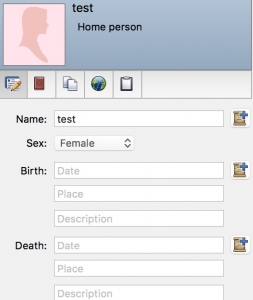 Each fact that comes preinstalled has three preset element options: Date, Place, and Description. You are accustomed to seeing these elements in the panel for each individual for the facts presented in the editing panel (screenshot at left).
The Fact Element options for all facts are Date/Place, Date/Place/Description, or Description only. As you can see from the screenshot below, this fact uses all three elements: Date/Place/Description. We can change this if we have reason to, but generally the default settings for the Fact Elements are appropriate.
In the field marked "Fact Sentence," we can see how a sentence using the Address fact will read in the few reports that use Fact Sentences:
{his/her/their} address was {description} {inPlace} {onDate}.
{his/her/their} will be determined by the sex field, {inPlace} will be "in" plus the place field, {onDate} will be "on" plus the date field, and {description} means the description we enter will be displayed mid-sentence.
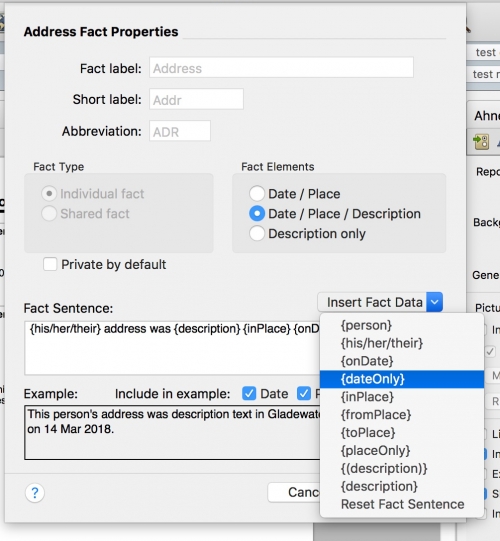
The example in the gray box below the fact sentence shows this with sample data. If we don't like how that reads, we can rearrange the fields or change the sentence, but be sure that all of the bracketed elements remain bracketed or it will break the data display. The easiest way to make changes to the fields without creating errors is to create your sentence using the dropdown choices for each element as shown above. Reset Fact Sentence will take the sentence back to the default format.
Maybe we have decided that we prefer to include the description at the end of the fact sentence in parentheses for this particular fact, since it doesn't necessarily flow in the middle of the sentence. To do that, we could change the fact sentence to:
{his/her/their} address was {inPlace} {onDate} {(description)}.
Note the parentheses inside of the brackets - that option instead of {description} will put the data inside of parentheses in the report.
These changes can be made to any fact, custom or default, in Family Tree Maker. This kind of tweaking to the settings will help you to personalize your reports and may allow you to remove or change awkward wording.
Do you have questions about the process? Let me know in the comments.


Tom Kern
Mary Ann,
Not sured if you're still accepting questions on this topic.
However...Followed all your directions for modifying the fact sentence...but "OK" buton alwyas xtays gray and never updates.
Thoughts?
Mary Ann
Hi Tom - Can you give me more specific information about what you are changing? Screenshots of the original fact window and after your changes would help me to try to replicate the problem.
Pat Fairfield
I have added a new fact field for my GEDmatch connections however I was wondering if there is a way to make a report on all of the connections. If I go to Edit - Manage facts - "Gedmatch" - Data options - backup I then get the list of 114 names of the people in my tree with their GEDmatch kit #. But how could I get a report which would include notes etc of the data entered for this new fact field?
Mary Ann
Hi Pat,
You'll need to use the "Filter individuals function" and then choose that specific fact. First, open "custom report" under Person Reports. Under individuals to include, choose "selected individuals." Click the "Filter in" button, and choose the All Facts tab at the top beside "filter individuals." Choose your GEDmatch fact and from the drop down menu below it, choose a condition of "Is not blank." Click OK, then Apply. That will give you a report with the list of all the individuals for whom you have entered data in the GEDmatch fact.
The resulting report won't contain the fact data yet. For that you need to click the tan button on the far left of the Custom Report Options. When you hover over it, it says "Items to Include." When you click it, you will get a dialogue box that includes some basic facts like Name, Birth, Marriage, Death. Click the plus sign at the bottom left. In the new dialogue box, check the GEDmatch fact and any other facts you want to include in this report. Click OK, then make sure the settings are how you'd like them on the main Items to Include dialogue box and click OK again. When the report generates, it will include only individuals who have data in the GEDmatch fact field, and it will list the data in that field for each individual.
Hope this helps!
Linda Shepard
Regarding custom facts - will they upload to ancestry.com? For example, I created a custom fact "Diary" and entered some info from my ancestor's diary and date. Now I am ready to upload and link to ancestry, but am wondering how custom facts will be handled.
Mary Ann
Hi Linda - I don't sync or upload to Ancestry so I have not tested this, but I do not believe that custom facts will upload (similar to color coding in FTM).
delford woodyard
I am trying to change fact statement,
Here is my fact statement {person} worked {description} {inPlace} {onDate} . this is what I get worked as an Oak Ridge National Laboratory, Mechanical engineering in Oak Ridge, Anderson, Tennessee, USA, in June . I think description has preload attach to it
Mary Ann
Hi Delford - Did you select Date / Place / Description with the radio buttons (located above the fact statement)? Just putting the description in the fact statement won't apply it if only Date / Place is selected with the radio buttons.
Susan
Hi Mary Ann - I am relatively new to using FTM and trying to understand the preferred facts versus not preferred when generating an individual report. I have 2 distinct separate emigrations for a great uncle, first from Scotland, and then a year later from Australia. How can I have both show consecutively in an individual report? Should I create a new fact, for example “Emigration #2”?
Thank you.
Mary Ann
Hi Susan - The settings for the individual report allow you to select whether you want to include all facts or only preferred facts. To access those settings, go to the Individual Report and click the icon on the top left of the Individual Report Options sidebar:
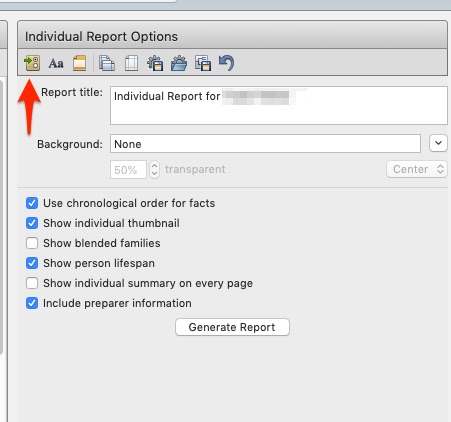
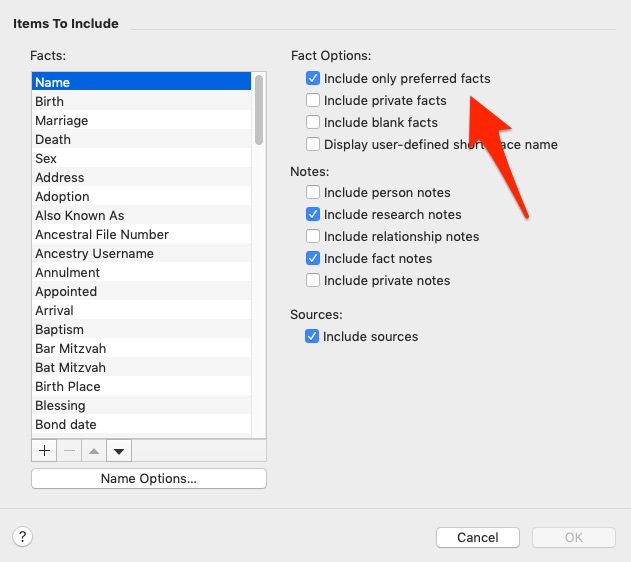
In the options, you'll see the checkbox for the preferred facts option on the top:
There are other options in that dialogue box that are useful, including which facts you want included in the report.
I hope this helps.
Michael Learmonth
Can I delete a "New Custom Fact" category after I have created it? It shows up in the Individual facts list and even though I ended up not using it, I can't seem to delete it.
Mary Ann
Hi Michael - You can delete custom facts in the same dialogue box where you add them. Just highlight the fact you want to delete, then click the minus sign on the left side below the window where all the facts are listed. Be sure you have the correct fact highlighted because I don't know what happens to the data for a fact if you delete it by accident.
Michael Learmonth
It is not a particular custom fact that I want to delete but the category of custom "Individual facts" namely 1891 Census that I have created by clicking on "New Custom Fact" and giving the Fact a label, that I now wish to delete.
Mary Ann
Hi Michael - I'm not following your process. I am using FTM Mac 2019 and I don't have the ability to create categories for custom facts. The only categories I can create are for Media, and I can create groups of sources by giving them the same source title. If you are not talking about either of those situations, a screenshot might be helpful in figuring out how to delete the item.
Mary Ann
The Fact label is not a category, it is simply how that fact is labeled in reports and the dashboard. Are you trying to change the name of the fact from 1891 Census? If so, you should be able to just double click on that fact in the list of facts and edit the fact label. You can only edit the labels of facts that you have created; labels for default facts cannot be changed.
Michael Learmonth
I am also using FTM 2019, although on a PC. If I have a person selected, and click on the "Customize View" button, a window pops up titled "Customize View" and it has a series of selection windows: "Individual facts", "Selected individual facts", "Shared facts" and "Selected shared facts". And at the bottom of that window are a series of buttons, left to right: "New Custom Fact", "OK", "Cancel" and "Help". If you click on "New Custom Fact" a new "Add Custom Fact" window pops up with places to enter "Fact label", "Short label", "Abbreviation" and buttons for Fact type, Fact Options, etc. If you fill in the "Fact label" entry and hit "OK", a new fact category is created. However, I have not found a way of deleting a new fact category if I have determined it is not useful.
Michael Learmonth
My email address is [redacted] If you email me your email address I can send some screen grabs illustrating what I have described (as there doesn't seem to be an ability to attach files on this site). Thanks Mike
Mary Ann
We are talking about the same thing using different words. You are accessing the fact menu from the customize view rather than the main management dashboard. If you want to delete the fact "category" click Edit > Manage Facts in the FTM dropdown menu bar, then highlight the fact "category" you want to delete, then click the minus sign.
Michael Learmonth
Very good. Thanks Had not accessed it through the main management dashboard edit facts function.
Mary Ann
Glad you got it situated!
Michael Learmonth
FTM 2019 has one preformatted fact type called "Census". I would like to enter a varying number of Census Facts as my ancestors appear in anywhere from 0 to 8 different censuses. So I created separate new facts: 1841 Census, 1851 Census, etc., each with their own date, place and description. Is there a way to have only one of these facts with certain individuals, and two with other individuals, etc? I also notice that the Customize View function changes the view for all individuals (that is, shows all 8 census facts for all individuals)?
Mary Ann
Hi Michael - Unfortunately not. Those settings apply database-wide and cannot be customized on a per individual basis. You might find it easier to leave them off of the customized preview and go to the individual tab to edit/add information. You can access the facts from the + sign at the top to enter data for the individual. All of the additional census facts you added will be available there for insertion without cluttering up your customized view on the main person page.
Michael Learmonth
Thank you Mary Ann. I have another question. I have hundreds of different media (mostly documents and photographs). I would like to group the media under separate subdirectories in my Learmonth Media directory by person, for instance: I:\Learmonth Media\Rudall, John 1816 1893\John Rudall - Margaret Mooney Marriage Certificate.pdf However, it appears on the Media detail page that the file location is shown, but not changeable. And when I try to point to the document's current location when importing, it simply copies the media to the general I:\Learmonth Media subdirectory. I have designated a category for each piece of media, but I would still like to break it up into subdirectories for ease of finding it (outside of FTM). Is there a way I can do that?
Mary Ann
If you are using external folders and choose "link to media" instead of "copy to media folder" when adding, it should maintain your structure and link to the files there. This will only work if you manually add the media files, however. If you are adding them using the web browser included in the program directly from Ancestry or FamilySearch, you cannot specify a location nor can you specify "link to file." The software forces the file to be placed in the FTM media folder.
Once you have linked to a file, I'm not aware of any way to change the file location, only the file name. If you want to change the location of a file, I think you would have to unlink it, move it, then use "add media" to link to it in the new location. If you move the files manually without doing this, you would have to manually find the missing files in the FTM media library for each file you moved.
Michael Learmonth
Starting with no media in my tree, I click on the Media button at the top and the Collection page comes up of course showing no present media. At that point, the choices available under the Media tab are, “Add New Media …”, “Create a New Smart Story …”, “Scan Media …” and “Thumbnail Size” plus 14 other choices that are grayed out. There is no “Link to media” option shown anywhere that I can find. If I click on “Add New Media” a window comes up in which I can browse to the media I want, but again there is no option offered to “link to media”. I can only highlight one or more pieces of media and when I click on “Open” the chosen media files are copied over to the FTM tree Media subdirectory. I don’t see how to simply link to it in the current/chosen subdirectory.
Furthermore, once FTM has copied it into the FTM tree Media subdirectory, if I move it to my desired other subdirectory, of course FTM alerts in red “File not found”. If I then click on that alert, a window pops up allowing me to “Manually search for this file” or “Let Family Tree Maker search for this file”. If I choose either one, FTM locates the file in its current (desired) location/subdirectory where I moved it, and once again FTM copies it over to the FTM tree Media file. I can’t see how to just link to it in its present location.
In the alternative, if I start with a Person page open (on a “Tree” page or on “Individual & Shared Facts” page), when I click on “+New” under the “media” tab, the same three selections listed above are available, plus a new one is listed, “Link to Existing Media”, but it is grayed out, so inoperable.
Can you advise me how to link to media in its present location without automatically copying it over to the FTM tree Media subdirectory?
Mary Ann
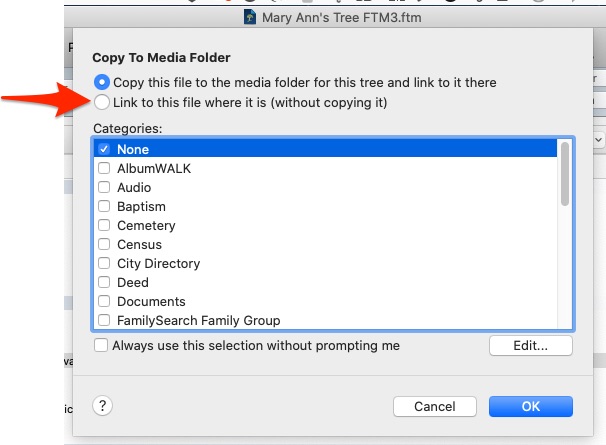
When the popup dialogue box with your files to choose from opens, choose the media file you want to add. Click Open. The next step asks you to select a category for the media. At the top of that box, you have a radio button allowing you to choose between copying the file to your media folder or linking to it in its current directory:
Michael Learmonth
Hello Mary Ann. I can't find the popup dialogue box that you are showing. I took screen grabs of the sequence of screens I follow to get media, but I can't seem to post these jpg screen grabs in this comment. If you could tell how to do that I could illustrate my sequence. Meanwhile, here is the sequence of screens from starting FTM, choosing and opening a tree, selecting the media tab, selecting to add media, then actually selecting the desired media - then when I hit enter the selected media is copied to the general FTM tree Media subdirectory. Where and how in this sequence do I get the Copy to Media File popup that you show?
Mary Ann
Hi Michael - If you know HTML code, you can post images using the img src code. If not, you can paste a link to the images uploaded elsewhere (IE dropbox, etc.)
I can access that box from anywhere I try to add media. In this example, I was on the main People view, then under the person column on the right I clicked the media tab. Underneath that I selected the +New button, selected the file I wanted to add from the dialogue box and clicked open, then the popup dialogue box with the categories and the "link" or "copy" selection came up.
What version of FTM are you using? I am using FTM 2019 for Mac, but this option should be available for Windows also.
When you add media and select the file, does it not take you to the screen where you can choose the categories for that file? If not, where does it take you? If so, do you not have the radio buttons at the top of the category listing?
Michael Learmonth
I am using FTM 2019 version on a PC. When I am on the person page as you show, and click on the Media button as you show, and then there are two parts of the New button: If I click on the left part where it says New a "Select media item" window opens that will allow me to browse to any file location, chose/highlight a file, but there are no choices, I can only chose Open and FTM copies it to the FTM tree Media subdirectory - no "Copy to Media Folder" window opens with selections to copy or link. If I click on the right part of the New button, where the down air is located, a pull down menu appears with 4 choices: "Add New Media ...", "Link to Existing Media ...", "Create New Smart Story ..." and "Scan Media ..." Selecting the "Add New Media ..." choice takes me to the browser that will copy to the FTM tree Media subdirectory; there is no popup choice window copy or just link. Selecting the "Link to Existing Media" pops up the browser showing the existing FTM tree Media subdirectory with whatever media has been previously copied. The "Create Smart Story" does that function (no copying or linking) and the "Scan Media" looks for an attached scanner to copy media into FTM tree Media subdirectory.
No, whenever I try to add media when I highlight the media file, nothing happens until I click Open and then it copies the file to the FTM tree Media subdirectory - no popup screen asking copy or just link.
By the way, is there I way that I can copy screen grabs to this chat to illustrate?
Alan
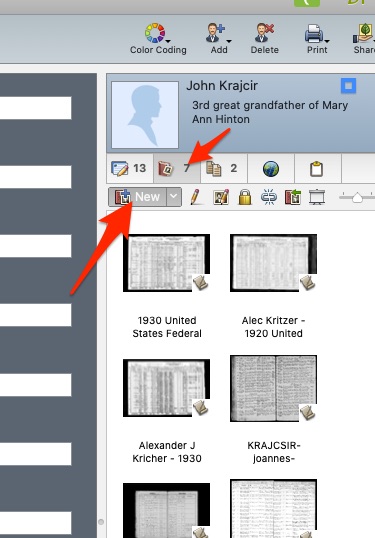
Mary Ann I just happened to stumble across your website and have learned a lot, so really appreciate the information and answers you a providing. I have a question concerning media as it relates to attaching to facts. On my person page it lists the number of facts, number of media, etc. The media number indicates 11, however the media files listed only show 10. And when I go to the person tab at the bottom it lists only 9 media items. If I go through each individual fact on the page under the Media tab on the right it only has 2 of the facts with media. Bottom line is what is the best method to attach media so it shows up in each listed fact? and everything is the same? hope this all made sense
Mary Ann
Hi Alan,
Thank you for your kind comments. Regarding media, I don't have a set way to add media. If I am browsing Ancestry and can add media through the FTM interface, I let the program add it automatically. Otherwise, I usually add it manually as a media attachment to a source (the most common way I add media). I don't think there is a single correct way to add media, but ideally however you add it will include the provenance of the media along with a citation.
My FTM is for Mac so our dashboards are probably a little different, but I see similar differences in my media numbers. When I compare the media that is in my Person page under the media tab, it only shows the media that I have manually uploaded (whether that was by adding it to a source or by using the Add New Media button). It does not show the media that was added through the browser interface with Ancestry.
Something to note about this as well is that if a source is multiple pages (for example a two page census entry or ship manifest listing), if you add it using Ancestry's interface it only adds the first page. It's preferable to download the images of all pages to your computer, combine them into one pdf file, then manually add that file to the source.
I avoid adding media to facts rather than sources because it will only show the media for that one fact, not the other facts that the source is attached to.
I hope this helps!
Donn
This is years after your initial posting. I took a session today through FTM and learned how to add a Custom Field. However, when I was going to start entering the info (Family Search ID#), the field label was grayed out and I wasn't able to enter any info. Any ideas?
Mary Ann
I am using FTM 2019 for Mac and can still successfully add custom facts. You might want to get in touch with MacKiev for support.
Bridget Key
Hello. Is there any way to order or alphabetize the individual facts listed under the person tab? I have so many facts that are in no discernible order. Thank you.
Mary Ann
Hi Bridget - The facts in the Person tab are organized chronologically with separate sections for Personal Information, Individual Facts, and Shared Facts. I'm not aware of any way to change this order, but you can help avoid stray facts by manually inputting a date whenever one is available because when a fact without a date is listed, it is listed below the facts with dates. Some sources have a date in the information that is not input as a date in the FTM fact (for example, WWIDraft Registration Cards have a date, but when FTM creates a fact for them, it doesn't include the date). By manually adding a date to those facts, you will allow FTM to list them in the correct chronological order instead of at the bottom of the section.